These are the flowers I call them Crocus, they are also called Cone and Pineapple can be made from plastic bottles. On the left there are bottles with a volume of 2.5 liters, and on the right 1.5 liters. One flower is made from bottles only!!! one volume. For this you need: manicure scissors and regular ones (you can use a stationery knife). I repeat once again, bottles for one flower only of the same volume and preferably similar in shape, fittings (I took a corrugated figure eight, you can also use a wooden stick) centimeters long 20-30 longer than the resulting flower, patience and great desire.
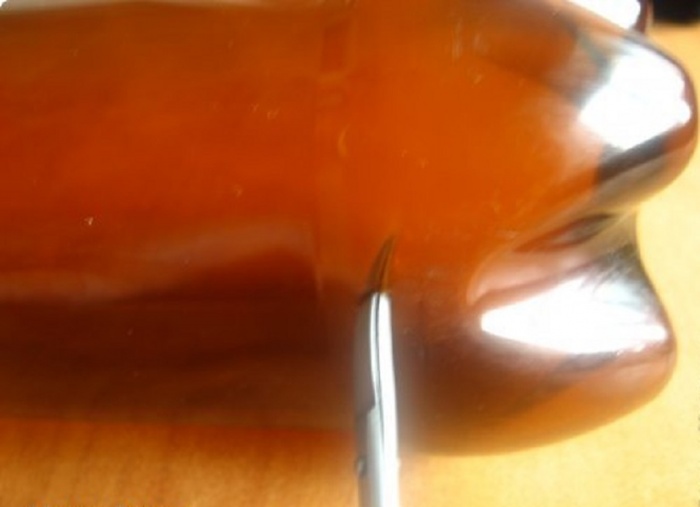
So we take the bottles, remove the label, and wash them well. This is how we pierce the side of the bottle (I invented this method myself, through trial and error, at first I tried to pierce the bottom, but it’s not very easy).
![]()
Then we insert scissors into the hole and cut like this (why I write that the scissors are manicure scissors, because they are very convenient for cutting the bottom, I tried with regular ones, I broke the handle).
![]()
Leave approximately 0.5 cm from the edge of the protrusion
![]()
This is how it should turn out.
![]()
And so on near each protrusion of the bottom. As a result, you get such an asterisk. If someone gets scared, don’t be scared; it’s cut easily and quickly, and this is the most difficult part of the work.
![]()
Unfortunately, not all bottles are even, there are some that I don’t recommend making from, they stick out in different directions and don’t turn out so beautifully. But it’s on this bottle that you can better see how to cut further, but with ordinary scissors. Without cutting to the hangers .Exactly how much should be left becomes clearer through trial and error. (Cut four or five bottles and insert one into the other with the neck down. They should fit a little tight, then you will get what you saw in the first picture). It’s better not We will always have time to cut before cutting.
![]()
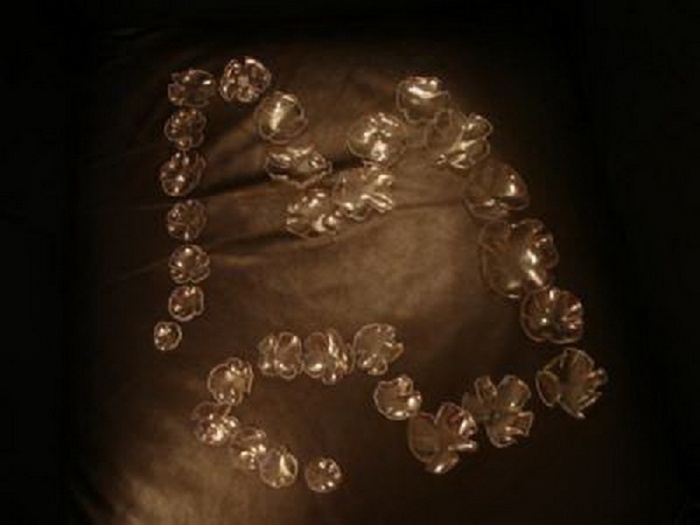
This is approximately what completely cut bottles should look like. Please note that all bottles are cut the same way (to avoid a sea of questions like: How is the top bottle cut? The same as everyone else). That’s all. For me, it’s more convenient to cut off all the bottoms first. then, I just cut everything off to the end. Don’t forget to take bottles for one flower only!!! of the same size!!! And advice, for those who have nowhere to put bottles for a flower. I cut as I accumulate bottles, 5-6 at a time pieces, and I put one in one with the neck down, as a rule, I have three blanks at once: 1.5 liter; 2 liters; 2.5. And you can put it in a corner or even on a windowsill. And once you get the required height, take it out to street, drive in a pin and string a flower (in a checkerboard pattern alternating the cut out leaves), the pin should not be visible.
![]()
And you can alternate the colors of the bottles according to your taste. I gave two of these to kindergarten. On the left are 2.5 liter bottles, and on the right are 2 liter bottles. You can try with different colors, blue mineral water bottles also look good.
![]()
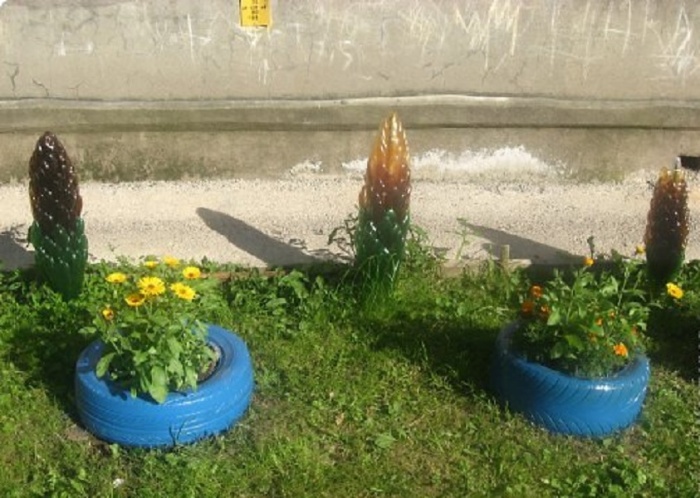
This is what they look like on the street.
![]()
Finally, I’ll write that the IDEA is not mine, I just want it to be clearer to everyone, and so that you don’t throw away bottles, you can make such beauty out of them everywhere (in the garden, near the entrance, near the school, near kindergarten etc.).Thank you for your attention. I will be glad if it is useful to you. If you have any questions, write, I will answer everyone.
Pine and fir cones- one of the most beloved ones that craftsmen use to make a variety of products. Candlesticks, photo frames, toys, souvenirs. And this is not the entire list of what can be made from these gifts of nature. In this article we will tell you how to make a hedgehog from cones and plastic bottle. The product is voluminous, beautiful, and stable. It can be used as a souvenir, toy or decorative element Location on.
With our own hands, we make a figurine of a prickly forest dweller from a pine cone and a plastic container. What do we need for this? We learn from the list of materials and tools:
Cut off the top of the plastic container. From it we will form the animal's face. Do not unscrew the lid. It will serve as a spout.

A hedgehog made from pine cones and a plastic bottle can become an original small flowerpot. You can grow green onions, dill or any other greens in it.
For a PET bottle laid horizontally, cut a hole in the middle. Glue the cones in two rows around it. Make eyes from buttons. Fill the product with soil through the hole and plant the plants. Place the figurine in the garden or on the windowsill. When the greenery comes up, the hedgehog will look even more beautiful and original.
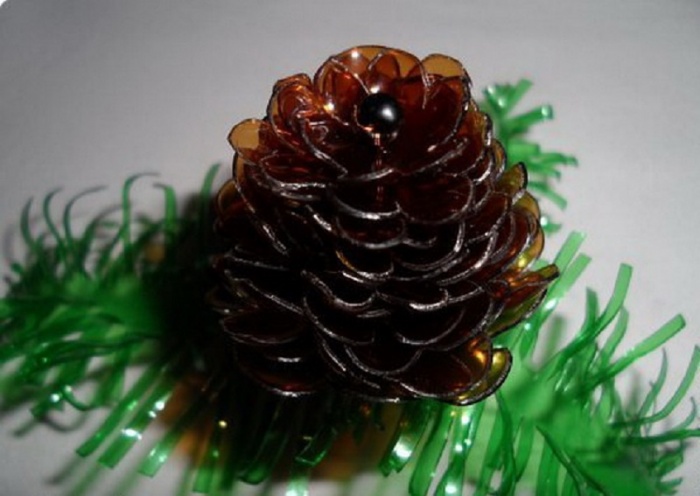
These are the cones I make from plastic bottles.
The manufacturing principle is the same as in the Master Class: Rose from plastic bottles
We cut 12 squares of different sizes from a plastic bottle.

We round the corners and cut out something like a daisy.

When all the details are ready, light a candle and burn the edges of the petals so that they fall down and the flower itself into a convex bowl.

Keep the part at a distance from the flame so that the plastic only deforms, but does not melt.

When all the parts are ready, arrange them according to size.
the top three are smaller than the bottom piece by a quarter. We make a puncture in the center with an awl, and then string the remaining parts in descending order.

We attach a bead between the parts, they will also create the tail of the cone.


When the cone is ready, cut out a spruce sprig from a green bottle, form it above the candle and secure it above the cone.

The Christmas tree toy is ready.

You can't buy this anywhere.

And this is my first bump. I made it three years ago. here the corners are sharp and simply bend back, without a candle. It can be done with children too. The assembly principle is the same.
By the way, such toys are a treasure for the street.

I hope you will find my MK useful in preparing for the New Year!
Crafts are often intended for landscape design of a site, but sometimes they also look relevant in an apartment. One striking example of widespread use is cones made from plastic bottles. Small, neat specimens will fit organically into New Year's interior rooms, giant products will effectively decorate the local area. The proposed master classes will help you master the art of forming cones for various purposes.
A pine cone, depending on the size chosen, can become a decoration for a plastic Christmas tree in the yard or be used at home as New Year's toys or serve as a key fob.
To make one copy you need to prepare:
So, Pine cone from a plastic bottle master class:
A cone without a frame looks uninteresting. A twig will help you achieve a spectacular composition. To do this, a strip is cut out of a green plastic bottle, and frequent cuts are made on both sides. The workpiece is held above the candle so that the “needles” move in different directions and the branch becomes fluffy.
At this point, the transformation of the bottle into a pine cone can be considered complete.
The second method is ideal for decorating the area. This could be a children's playground, a summer cottage or a house flower garden.
Available materials and tools:
Attention!
Manicure and stationery scissors (entirely metal, without plastic handles).
Giant cone made from plastic bottles master class: The cone can be made monochromatic or combine 2-3 colors. Keep a large number of

plastic containers are not always convenient, so after accumulating 5-6 copies, the bottles can be cut, as described in the master class, and left folded. This way they won't take up much free space.
Pine cone: manufacturing stages
To make one copy you need to prepare:
So, a master class pine cone from a plastic bottle:

A cone without a frame looks uninteresting. A twig will help you achieve a spectacular composition. To do this, a strip is cut out of a green plastic bottle, and frequent cuts are made on both sides. The workpiece is held above the candle so that the “needles” move in different directions and the branch becomes fluffy.
At this point, the transformation of the bottle into a pine cone can be considered complete.

The second method is ideal for decorating the area. This could be a children's playground, a summer cottage or a house flower garden.
Manicure and stationery scissors (entirely metal, without plastic handles).


.png)

