
Date of publication: 03/20/2018
Paper is an amazing tool for creating crafts, cards and even layouts. You can make airplanes and even weapons from it. And today, on the eve of Women's Day, I wanted to please you with ideas for paper flowers. I specially selected options with different levels of preparedness, so that small children could create and adults would be inspired to create them.
By the way, such crafts look very interesting as interior decor if they are made in general color scheme apartment design. I had the pleasure of making several bouquets with my daughter to give to grandmothers. The time spent with the child is reflected in his exclamations, “And mom and I did this!” and eyes burning with inspiration.
I invite you to master classes in different techniques. In addition to paper, we will use wire, candy and yarn.
I was really excited about the mimosas. They look very realistic, and are made very quickly, because the buds themselves are pom-poms made of yarn, which are quickly made with a fork.
We will need:
The photo shows how to make a pompom using scissors, but you can also use a fork, also tying the middle between the second and third teeth.
You need to wind the thread often to avoid bald spots in the flower.

To prevent the buds from falling under their own weight, we need wire. We screw it to the middle of one flower.

Now you need to wrap the wire with green paper to get a stem. To do this, we glue the base of the flower with glue or using a glue gun, so we fix the edges.

After one or two turns, attach the second bud.

So we do five or six flowers on a branch.

Now you need to make leaves.
A long strip of green paper will need to be wrapped around a kebab stick. But first you need to make many cuts along the entire length, not reaching the edge 1 centimeter.
Take a total width of 4 centimeters.

Wrap the prepared fringe around the stick, pulling it tightly.

This is what we get in the end. I congratulate you, a bouquet for the international women's day ready!

I also came across master classes made from egg trays. They are also made entirely of paper, only they have a recessed shape.

These same trays will make a wonderful flower wreath that can decorate your apartment or cottage.

This cute panel of daffodils looks like the real thing. See how easy it is to repeat all the steps.

The first spring messengers made of paper turned out to be very tender.

The needlewomen have already come up with all the steps for creating such paper beauty for us. We can only repeat.
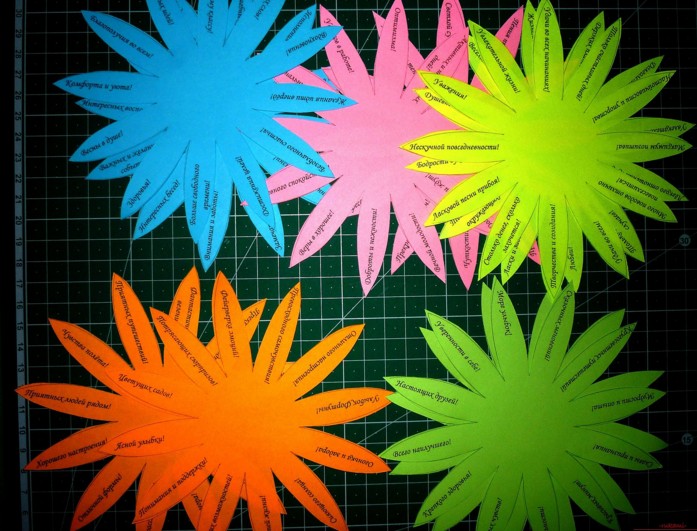
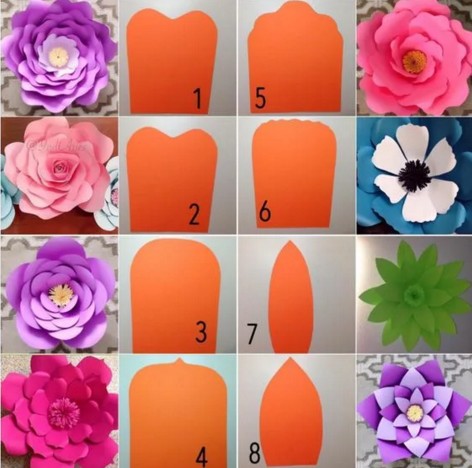
To go through preparatory stage In preparation for the craft, I will give several popular and most often used templates.
You can use them and cut out, rather than draw, the leaves yourself, this will save time for busy parents, and also reduce the waiting time for an excited child.

These diagrams are suitable for such gerberas.
Each petal bends lengthwise. The templates are overlapped and glued to the center.
And the three middle levels need to be bent with the petals towards you to achieve volume.

Another template for creating a fantasy flower.

Popular patterns are daffodil, bluebell and chamomile. 
With these templates you can create a whole bouquet using paper of different textures and colors.
Making voluminous flowers is not at all difficult, the main thing is to choose the right colors and carefully cut out all the contours. Otherwise, you may end up with painstaking but sloppy work.
You can get extraordinary hyacinths with a little imagination.

Take a strip of paper, 5 centimeters wide and 10 centimeters long.
Before reaching the edge, we retreat 1 centimeter and begin to make a fringe 1 centimeter wide.
If you are not sure that you can immediately cut straight, then first draw lines with a pencil along the ruler.

We bend each strip to the edge. We bend in one direction only.

Roll up a tube from a green strip measuring 4*10 centimeters. Fix the edges and the middle of the product with glue.

Now you need to tightly wrap the flower blank around the tube, placing the base on top of each other.

Prepare the leaves and attach them to the base with glue.

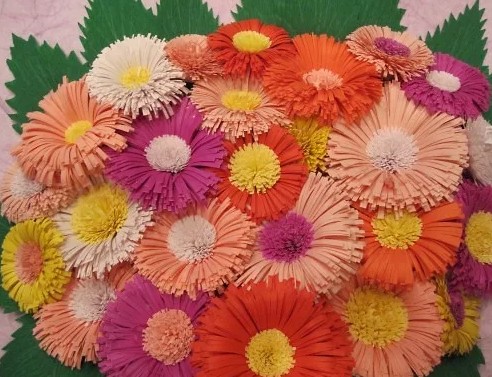
Using different shades, you will create a bright rainbow bouquet.

I present to your attention interesting craft in the form of a ball, which consists of gerberas.

You will need:
The picture shows that a saucer was used to create the circle, but you can also take an ordinary compass or any other round object.
We need to make 8 circles of different sizes.
2 circles with a diameter of 10 centimeters, 2 circles with a diameter of 9 centimeters, 2 circles with a diameter of 7 centimeters and 2 circles with a diagonal of 6 centimeters.

Fold the circles in half to determine the middle. Then, using a coin, we form the petals. We connect their edges to the middle. Determine the center of the flower.

We cut the lines of the petals to the center and bend them along vertically. Glue all the levels and decorate the center of the flower.
There is one for kids unusual ideas when you can not only show your imagination, but also decorate your house.
I suggest making an interesting bouquet in a real flowerpot. You can use any store-bought pot, or maybe you have an already used one lying around somewhere.

You can use the bottom of a plastic bottle as a pot and paint it.
A sheet of green paper needs to be drawn in strips 1 centimeter wide and 8 centimeters long.

We cut them to the line and glue the edges.

We place the finished grass in a flowerpot, having previously wrapped it with double-sided tape so that the leaves do not come out.

We cut out the buds and cores ourselves.

Glue the cores in place and go to complete the craft.

I was also impressed by the daffodils that stood on my grandmother’s table during my childhood, only they were made of plastic, but they looked exactly like in the photograph.

Let's start making them. For one flower we will need three levels of petals.
For them, take squares with a side of 6 centimeters.

Fold them in half twice and cut out the petals, not reaching the center 1 centimeter. There should be four petals.

We lay out the flowers and see if all the buds have received petals.

We make a fringe from a strip of corrugated paper, 2.5 centimeters wide and 16 centimeters long. The paper stretches easily, be careful.

We roll up our core and glue it to the bud.

You can stick the finished flowers directly onto the leaves or form a stem from the wire, wrapping it with green paper or ribbon.
Origami greatly develops logic and motor skills. Of course, little children will not be able to fold a piece of paper evenly, but for a schoolchild this is an excellent activity.
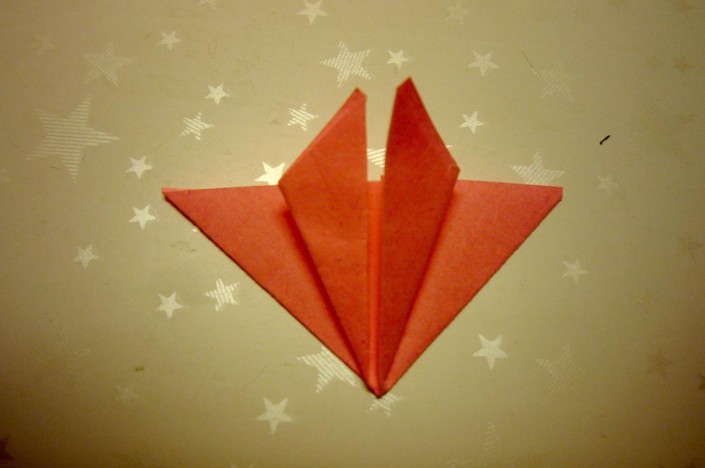
Today we will try to make a tulip. Ready? Then make a square out of a piece of paper and let’s start creating.

The diagram shows detailed instructions by folding the sides.

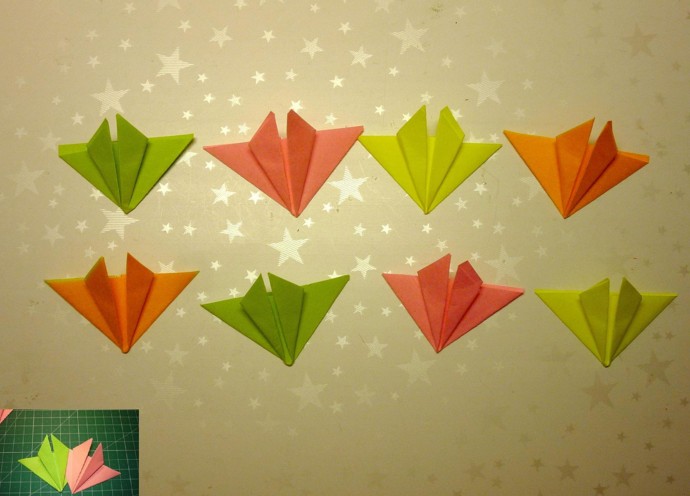
This lotus also looks incredibly beautiful. And it is also made using origami technique. Of course, before everything works out, you will have to puff, this is not a self-sufficient tulip. There are more petals here.

To create this craft, you need thick paper, such as landscape sheets.

First we make blanks. We will need four white stripes, and also take 4 green stripes.

According to this principle, you need to fold all the white and green stripes.

Place white blanks inside each other

Find the middle and sew it on the machine, this way you will fix all the blanks in the center.

Now you need to open the petals.

I think that any girl and even woman will like this decoration.
Very original ideas made from candy and corrugated paper. I made it from one that is sold everywhere in office supply stores. But somehow, while watching another master class, I realized that their paper was different! More dense, it holds its shape better.
So, you can use the most affordable paper, but it will be better if you take the trouble and buy the one that florists use. Believe me, the difference is very noticeable.

We will stick candies onto the kebab sticks using tape.

Now you need to prepare the blanks for the rose.

Each top must be bent using a stick or thin rod. It is optimal to use a lollipop handle.

Wrap each candy with the prepared petals.
You will achieve greater similarity if you stretch the paper a little at the place where the candy will be located.

All the best and have a bright day! Very soon, in a month, the first flowers will appear, I suggest not to wait for this and make your own flowers from paper. After all, you can give such lovely gifts of nature without a reason, but if you need a reason, then don’t forget to congratulate your mothers and grandmothers on March 8 or Happy Mother’s Day, because it is on these days that such crafts are always given.
Let them be paper, but they can be presented so cool and superbly that they will look even better than alive, and even more so they can stand on a table or shelf for a single year. And this certainly makes me happy. Take a look at this picture, do you like it? If yes, then I showed you step by step how you can do this.
In my opinion, today’s theme will always be popular, because this is the most beautiful and delicate souvenir that you can give for any occasion. So, I suggest you hang out with me for a while))).
Souvenirs that carry something unusual look unrealistically beautiful and original. I propose to start with the most seemingly simple option, but who, just look. This is a daisy, but not simple and not fabulous, but with wishes, how nice it would be to give one, don’t you think?
Moreover, you can download ready-made templates directly from this site and print them on a printer. This is a very cool souvenir that will hook anyone. You can give it for any occasion, such as a birthday or Teacher's Day.
We will need:
Stages of work:
1. Start by deciding on the shape of the flower. I suggest taking this seven-flowered flower. Print the blanks on the printer. The first template will be like in this picture, I will send all the rest to you by email, just write your comment below (there are 10 in total), or you can come up with your own words or messages.

2. Here they are handsome, now take scissors, or you can use a stationery knife and cut along the contour.

3. These are the cute and funny preparations you will get.
4. Cut out a circle of cardboard with a diameter of 5 cm and place the first flower and a satin ribbon and drop glue into the middle or smear it if you are using a pencil. So gradually glue everything.

5. Now all that remains is to decorate the middle beautifully. To do this, take a square, approximately 3.5x3.5 cm. Bend it like this.

6. Then make a triangle as if you were making a frog.

7. Fold the ends forward.
8. These are the butterflies you will get.
9. Which all that remains is to connect, glue to each other, and cover the middle with something interesting, for example, a bead or rhinestones. The result is a very original and unique craft, the person for whom you made it will definitely like it.

The most common and easy, especially for children, is the figure-of-eight flower using a hole punch and buttons.

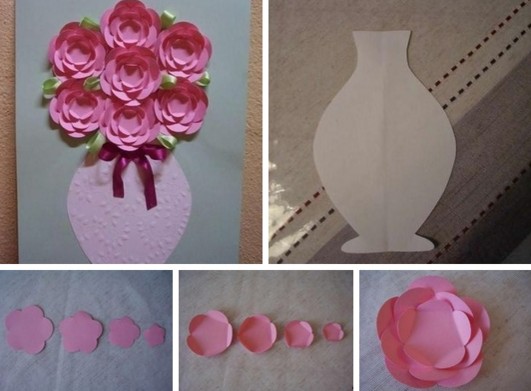
Undoubtedly, the king of all flowers are roses, how to make them, to be honest, there are a great many options. I will write about this in more detail someday. Now take this masterpiece as a basis.

Or here’s a sample, you need to draw 5 flowers from largest to smallest, and then arrange this thing in a vase.
I know many of you will be looking for roses, because these are the flowers that are customary to give in most cases. Well, here's your first briefing. Take corrugated paper and make petals out of it. First, cut out the strip, then fold it like an accordion and round the edges. After this, you should twist it onto a stem, which could be a stick or something similar.

Also decorate the stick with green corrugated paper.
You can make such a wonderful creation from plain paper, but it is better to use crepe paper or corrugated paper. Draw a spiral yourself in a circle, cut it with a knife, and then wind it onto a pencil or crochet hook.

Or use this usual scheme, you can do this in 5 minutes.


Their work steps are absolutely simple. Remember how you made bookmarks in childhood, the system is approximately the same))).

The flowers themselves can also be twisted to make them look more interesting, as if they had truly bloomed.

In general, quite a lot of models can be composed and made from paper, the main thing is depending on the shape of the petal.

Notice these features yourself and you can make daisies, chrysanthemums, dahlias, and even carnations, take a look at the following pictures. You can see petal templates for cutting out.

Or do you prefer lilies with peonies?

What kind of flower is this? Did you guess it?

You can make such a charmer in the form of a brooch).

Snowdrops, as we know, are the first to please us. Moreover, you can make the flowers themselves from pumpkin seeds.

And of course, I couldn’t pass by foamiran, use this material too.

Dandelions follow them. Make them from regular napkins using a stapler.

This bright option would also be an excellent solution to surprise everyone.

They remind me of asters.
This view completely captivated me, I fell in love with it at first sight. It really looks like a living or real dahlia.

You can make primrose. You will need squares, from which you need to make figures that look like triangles.

Also roll the other side to form a triangle and a petal for the future bud. Then glue them together. Make the stem and leaves.

The next option looks great, as if it were real.

Not so often, but you still have to make such products from ordinary large sheets. Of course, you can use such luxurious crafts anywhere; they look especially good if you decorate walls or a hall with them, that is, use them in the interior of premises.
Each leaf is a large petal that you will have to paint in the desired color.

Larger flower options can also be made in the form of a rose. Initially, you will need to use a template.

And then follow all the steps presented step by step.
You won’t believe it, but you can quite simply and in a matter of minutes twist a gorgeous bouquet, watch this video and you will also learn this interesting activity:
At some point in our childhood, we all folded different figures and used origami. I remember during labor lessons I really liked this activity. The tulip is usually done using this technique. It turns out voluminous and looks like the original.

You can also make an open type bud.

Or take another idea from corrugated paper as a basis and hide a candy in a bud. No one will refuse such a gift, that's for sure!

And here’s another great idea with disposable spoons. This gift can be given for a birthday or even a wedding.

Stages of work:
1. Prepare everything you need for work, all components are shown in this picture.

2. Cut scarlet rectangles from corrugated paper and then wrap the spoon in this material, as if slightly twisting it on a stick.

3. What does it look like? Of course, for the petals.

4. Mask the stick with green paper, while stacking the spoons towards each other (4 pieces) to form a stem and a bud. Then cut the leaves into a specific shape.

5. Place the craft in a pot or cup. You can tie a bow or some other pattern.

Now let's learn how to make the simplest option, because for some the previous ones will seem very complicated, then this present will come to your aid.

We will need:

Stages of work:
1. Take a sheet of paper and fold it in half to form a triangle. Then again.

Then draw semicircular lines like you see in this illustration. Cut out according to the sample and follow further instructions.
2. Unfold, open the workpiece and glue a couple of strips to the middle.
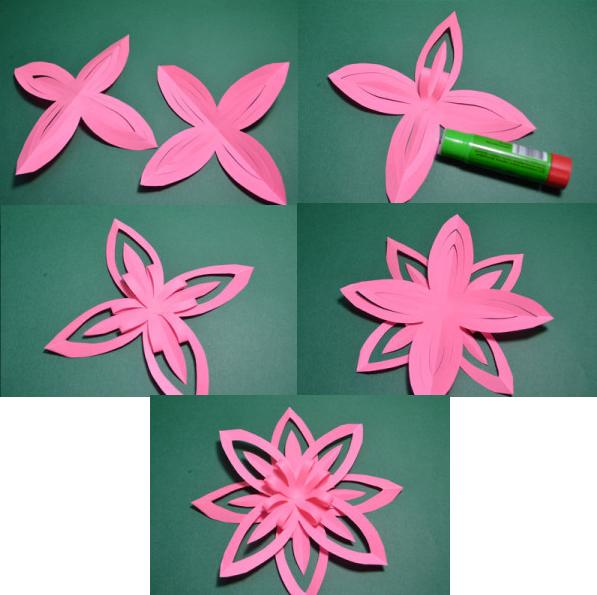
This option is suitable for the youngest, for example preschoolers.
But with schoolchildren you can do something even more difficult. The meaning is the same, just bend the petals and glue them differently.

You can also make a red poppy or take a different color, but for this work you will need more wire.

I am very much in love with asters, do you love them?

Want to know how these can be made?
We will need:

1. Take the magazine apart into pages, fold each page in half, then again and again.

2. Take scissors and cut with grass. To make a fringe.

3. Afterwards, wrap this beauty on a stick.

4. After this, fluff the product. Cover the stick with green paper.

Something similar can be done to a teacher or, for example, an aunt or grandmother.
1. You will also need napkins and corrugated paper, plus you will also need a disposable glass or a jar of sour cream.

2. Since the flowers will be large, you can make them smaller, take a napkin and fold it in half, then in half again, and again. Secure the middle with thread or a stapler.

Cut the petals with scissors and give them shape.
3. Now prepare a glass, cover it with corrugated paper, push crumpled newspaper or unnecessary paper inside, also cover it with corrugation and let it out as if it were grass.

4. There should be 10-12 pieces, it all depends on your abilities.

5. Using glue, attach the resulting flowers to the base. Quite modest, but at the same time bright and stylish, such a gift will please anyone, especially women or girls.

What kind of crafts are not made of these days? They even adapted egg molds for this work. It’s a shock to me how and when it could have occurred to anyone, but it came and conquered everyone. At first it looks unattractive, but then it turns out amazing masterpieces.

The sample is painted with paint and placed on a wire or stick.

A wonderful souvenir, as they say, made from improvised means, and how beautiful and funny it looks.

You will agree that with such voluminous flowers you can quite easily and quickly decorate any interior of a room or hall, making it irresistible and unforgettable.
You can also use this chic flower garland.

After this, put each workpiece on a fishing line or thread.

You can also make unforgettable creations from paper bags.

Using the origami technique, you can fold and then glue the parts.
And the coolest volumetric look, which I really liked and I advise everyone to do it, is this one:
Do you like calla lilies? Then take note of this master class.
You can even make a masterpiece out of ordinary newspapers.

By the way, you can even make Pansies with your children.

I once showed you how you can make roses and hide candy in them, remember? Look how gorgeous the bouquet turned out, and we presented it for Valentine’s Day, if you forgot, I’ll remind you.

I also give you this diagram to help you.

You can easily jump in and follow the step-by-step instructions.
Or use this video, you can’t do without roses:
That's all for me, I wish you inspiration and great job. Come visit me more often, join my group in contact, write your reviews and comments. Good luck and see you again! Bye!
Sincerely, Ekaterina Mantsurova
You are in the coloring category Flowers cutting templates. The coloring book you are considering is described by our visitors as follows: "" Here you will find many coloring pages online. You can download coloring pages Flowers templates for cutting and also print them for free. As is known creative activities play a huge role in the development of a child. They activate mental activity, form aesthetic taste and instill a love of art. The process of coloring pictures on the theme Flowers, templates for cutting, develops fine motor skills, perseverance and accuracy, helps to learn more about the world around us, introduces us to all the variety of colors and shades. Every day we add new free coloring pages for boys and girls to our website, which you can color online or download and print. A convenient catalog compiled by category will make it easier to find the desired picture, and big choice coloring pages will allow you to find a new one every day interesting topic for coloring.
Using templates, figured ornaments and entire thematic pictures are created. Stencils vary in size and material: vinyl, paper or even plastic. For independent work you will need lavsan film. It is placed on a glass surface, under which it is placed. Then a template is made from the film.

Cutting is done from the middle part of the picture and from small parts. If a large ornament is to be applied, then the template is made in parts. Separate sections are mounted to the wall.

It is better for beginners to use self-adhesive products, while experts use glueless options, on the back of which the adhesive composition is distributed.
Application consists of several stages:
| Image | Stages |
 | Preparing the stencil. All unnecessary elements are cut out. |
 | The layout is attached with tape. |
 | The selected shade is distributed over open areas. |
 | After drying, the stencil is carefully removed from the work surface. |
When distributing the coloring solution, it must be taken in small quantities so that smudges do not form on the walls. If the pattern consists of several types of paint, then before each application of another paint you must wait until the applied layer dries. Poorly painted areas are corrected with a thin brush.

Related article:
Stencils for furniture decoration are selected with flowers. This is true for Provence style furnishings. Floral designs are suitable for any room. Picturesque daisies, roses, tulips and poppies add variety and personality to the room.
Helpful advice! Look stylish voluminous jewelry. To create a spectacular image, it is worth choosing acrylic paints various tones.
Depending on the technology, certain stencils are selected. The direct version is a sample with floral patterns. Floral motifs can be made more natural or given an abstract look. Flowers are suitable for.
DOWNLOAD a selection of flower stencils
Features of cat stencils for DIY decor: templates and ideas
There are many unconventional ideas for creating children's decorative stencils, such as designs with cats and other animals. Similar figures can be depicted on walls or furniture. Silhouettes of animals or their faces are used. Such pictures are suitable for, boudoir, or. As an option, tiger stripes or leopard spots are used as decoration.
DOWNLOAD a selection of cat stencils
Advantages of butterfly stencils for DIY decor: templates
It is necessary to decide on the form of the application. You can transfer the silhouettes of the most unusual butterflies onto a stencil. If you can’t draw it yourself, then you should find ready-made examples with butterflies to print. In some cases, ready-made stickers with butterflies are used.
The nuances of making geometric templates
You can use unusual stencils for DIY decoration. Patterns of geometric shapes will allow you to create a unique and individual environment.
A patterned wall looks original; it does not have to cover the entire wall. A repeating stencil is used to create a pattern in the oriental style of Samarkand. Geo-motives are relevant.
Geometric patterns are ideal for decorating an Art Deco room. An excellent example of geometric patterns are Byzantine or Greek patterns. Simple lines intertwine into complex ones and look very intricate. Designs with straight lines are easier to cut out.
Options for borders
Stencils are used to decorate borders. They consist of a repeating pattern and the pattern is used several times. Images of butterflies, leaves and simple ornaments are suitable for borders. Such images are distinguished by their brevity.
Before using the stencil, the wall surface must be carefully prepared. It should be cleaned of dirt and dust.
- a level is used to make markings;
- Before painting, it is recommended to practice on whatman paper or a piece. This sample will help you choose the color for the ornament;
- Aerosol glue is used to fix the stencil. It does not stain materials. The adhesive composition is distributed over the surface and creates excellent adhesion of the stencil to the wall;
- It is better to use acrylic solutions. They dry quickly and are recommended for any surface;
- if a sponge is used when painting, then first impressions are made on a piece of paper to remove excess paint;
- it is important to ensure that the paint flows smoothly in small elements and corners;
- To make a three-dimensional drawing, acrylic putty is used, it is distributed using a spatula. If the layer is not smooth, then fine sandpaper is used to level it.
The most common mistakes when working with a stencil are paint leakage and sample displacement. To avoid such problems, you need to take a small amount of paint each time and secure the stencil more tightly.
Studying the techniques of creating stencils and detailed instructions will help you get a luxurious and high-quality decoration.
Advantages and disadvantages of DIY stencils
The widespread use of stencils is due to their special advantages:
- using one type of pattern you can create an entire composition on the wall;
- combinations of shades are used;
- ease of use and accessibility large quantity pattern options;
- non-standard wall decoration and;
- templates are used for any surface, regardless of structure and texture;
- Using samples for painting, minor cosmetic repairs are carried out, since covering the wall with ornaments greatly changes the appearance of the room.
Templates are used not only for decorating, but also for creating a variety of postcards, collages, etc. A stencil is necessary for a variety of decorative works. It helps create original space, volume and depth, and also serves as inspiration for creativity. This is a budget-friendly way to bring something beautiful into your home without spending money.
Every woman dreams of being surrounded beautiful flowers. In order for them to always be with you, you can create various flower arrangements right on the walls of the room.
All kinds of flower stencils can be made with your own hands or purchased in a store.
Flower stencils - great option quick interior changes. When using them, you can create real flower arrangements on the walls of your apartment and enjoy a cozy atmosphere.
Advice! Among the many types of flowers, professionals recommend choosing roses and daisies for wall decoration.
You can make flower stencils with your own hands, armed with thick cardboard or polymer film. Flower stencils and templates are a great way to decorate a living room or a young princess’s room.
Roses or daisies, made on a dark background, can even be used to decorate the entrance. First, stencils and templates are transferred to dense material so that they can be used for a long period of time. Next, the surface that will be decorated with flowers is selected, and the design from the stencil is carefully copied onto the wall.

Using a flower stencil, you can make positive changes to plain items of clothing.
How to create a stencil of flowers for cutting out of paper? The templates offered in stores are completely ready to use. You just need to stick or sew it onto the product, then proceed to transfer the design.
Advice! Armed with a “flowers” stencil, you can update your old plain wallpaper.
In addition to wallpaper, such stencils are suitable for decorating windows and ceiling surfaces.
If you arm yourself with watercolors, you can create entire compositions on the windows.
To do this, you first need to attach a stencil to the window, trace it along the contour, then paint it with certain colors inner part Pictures.

Child psychologists are convinced that “flower” stencils are needed for decorating preschool institutions.
Various color stencils on the wall allow you to create real stained glass windows. For example, if you decide to create a lawn of daisies on the wall of a children's room, they will look great against the backdrop of dark, rich shades. The rose stencil looks harmonious on a green wall, and you can also choose light colors for it.
Roses are considered noble flowers, so they are characterized by different shades.
Advice! When creating flower pictures on the walls, you can involve children in the work. They will be able to show their Creative skills, will feel the demand for work related to the design of the room.

When creating flowers for decoration with their own hands, children develop artistic taste and develop fine motor skills.
Children can make various paper flowers on their own; for such work they do not need the active participation of a teacher.
You can also use flower stencils for shared leisure time. For example, first children work with ready-made templates, creating the basis of the composition, and then add additional elements to the drawing at their discretion.

In order for the created template to be used for a long period of time, professionals recommend creating them from durable polymer material. For example, you can arm yourself with a thick film, making a rectangular piece out of it. Next, a drawing option is selected.
Advice! To make the stencils easy to use, it is best to choose simple designs in which you can draw all the details.
A design is applied to the prepared surface, then cuts are carefully made with scissors, then all unnecessary fragments are completely cut out, obtaining a workpiece ready for use. Without certain skills, it will be quite difficult to immediately make a complex workpiece with your own hands, so professionals recommend trying to make a simple template first.

Master classes on making flower patterns can be found in design magazines. If you strictly follow all the stylists' recommendations, you can create excellent templates with your own hands that are suitable for decorating walls, ceilings, and window openings.

Before you start painting directly on the wall, the surface must be carefully prepared. For example, if unevenness is detected, the wall is leveled and then primed.
Advice! Plaster mixtures are suitable for work related to priming the surface.
The walls are primed with deep acrylic impregnation so that a durable and high-quality surface is obtained. Next, you can proceed to applying the base. Professionals recommend choosing white façade paint as the base; you can purchase it at any hardware store.

Attention! For the base, you need façade paint intended for exterior finishing work.
After the fragment of the surface on which the stencil will be used has dried, it can be washed with water.
Paint is not suitable for interior work due to the fact that during use of the image made, it will gradually be washed off, as a result of which the image will lose its aesthetic appearance.
To carry out decorative work, you will need a color scheme intended for outdoor use. Professional interior designers recommend choosing brushes with artificial bristles for work related to transferring designs onto the surface of walls.
Brushes with natural bristles are not suitable for such work (they leave streaks on the surface).

In order for the brush to be used several times, immediately after use, it needs to be washed.
Advice! To set the color and dilute several shades of colors, you will need ditches. The colors can be mixed in any clean containers available on the farm.

If you decide to use a ready-made stencil, you can transfer it from paper to a plastic blank. For example, the remains of a thick document folder are suitable for these purposes. Using a marker, you need to transfer the design to this base, then use a sharp knife or scalpel to cut out the contours of the image.
Advice! If you plan to use large stencils to decorate walls, you can attach the stencil to the wall using tape or special glue.
The glue is first sprayed onto the stencil, and after a few minutes you can glue the template to a specific area of the wall.

If desired, you can choose multi-layer or single-layer stencil options. If you choose a single-layer pattern, you can apply the design in one go. The disadvantage of such blanks is the ability to use only one color.
Multilayer stencils are suitable for repeated use. You need to work with them in stages, allowing each layer to dry completely. To get the desired result, you must first apply the bottom layer, then add the next color to it. Work is carried out until the entire color gamut selected for a particular image is used.

Many owners of urban and suburban real estate are not limited to using traditional options decorating walls and ceilings, they try to use their creative imagination, make stencils to complement plain paint or wallpaper with original compositions of roses, daisies, and bells.

In order for the created drawings to become a true decoration of the interior, it is necessary to think about not only the size of the drawing, but also the colors that will be used for it.


.png)

