
So, when creating crafts with your child for Cosmonautics Day, you can tell him about the structure of our Universe, about the difficulties that astronauts have to face, and about rocket science.
The rocket is the main means of exploring outer space. This can be clearly displayed on the application, the main objects of which will be the spaceship and our planet Earth. To make the picture brighter and more interesting, we complement it with decorative foil stars.
Look at the video on how to make a very bright and colorful craft on the theme of space:
In the form of an application, you can create an image of yourself. And so that the child can dream and imagine himself in the role of an astronaut, you can place his photograph in the porthole.

It is very interesting for children to hear about the cosmic feat of our Soviet hero dogs Belka and Strelka. And making applique with them will bring great joy.

Using the applique technique, you can create an amazingly beautiful outer space with planets and stars.

Application "outer space"
Younger children can be asked to assemble an image of a rocket from pre-prepared templates - for example, by correctly distributing and gluing round portholes and flames.

A space rocket can be made from ordinary plasticine.

A very beautiful rocket is made from salt dough.

To make such a rocket, add to salty dough paint and a little PVA glue. Mix thoroughly. We make several colored pieces of salt dough with paint and glue. Next we sculpt the rocket itself. The craft turns out to be very durable if it is dried in the oven and varnished.

Children are usually interested to know that a rocket is a very large spacecraft, which, after being launched into space, is almost always outside the earth's orbit. And food supplies to the astronauts on board are delivered by a small pilot-controlled spacecraft - the shuttle.
Offer to make your own shuttle from a roll from toilet paper: by flattening it a little on the sides, you get the hull of the ship, which needs to be glued onto the wings. The model turns out to be three-dimensional, and if you carefully cut a hatch in the upper part, the child will be able to put his toy into the space shuttle.

Or you can make a rocket from part of a cut out cardboard roll.

A very beautiful rocket is made from a cardboard roll and clothespins.

You can also make a rocket out of a roll; just attach a cone-shaped top and cardboard wings.

Another option for making a space rocket is to make it from corrugated paper.

Watch the video on how to make a beautiful origami rocket out of paper:
Not a single rocket can fly without a pilot - this is its main difference from a satellite. The pilot of a spaceship is called an astronaut, and what makes him recognizable, of course, is his suit - a spacesuit.
You can offer to glue together an astronaut’s space suit for your child, after first drawing it and cutting it out of paper. For younger children, we suggest gluing together templates prepared in advance and then coloring them.

A truly space portrait of an astronaut is made from a disposable plate painted silver. To make it look like a spaceship, we pierce the edge with a hole punch and attach metal elements to it.

In various ways you can depict the expanses that astronauts plow on their ships. Using a cardboard circle as a base, you can make a model of the galaxy, replacing the planets with soft pom-poms different color and size.

It is convenient to use foam or plastic balls as planets. This model will become even more impressive if a bright yellow hemisphere – the Sun – is placed in its center. From cardboard packaging for processed cheese, plastic bottle and wooden sticks you can make a very impressive flying saucer.

An incredibly adorable flying saucer can be made from plasticine on a plastic lid.

Watch how to make a fun space-themed craft in the video:
And this wonderful craft for the Cosmonautics Day exhibition was made from a cardboard box. Cover the box with foil.

We cut out space figures from paper and hang them on strings, which we attach to the top of the box.

This craft will decorate any space exhibition.

Such children's ones, made with their own hands from different materials for creativity, will certainly kindle in children an interest in exploring the unknown and will develop their Creative skills.
And here is a wonderful cosmic drawing illustrating the most vivid cosmic images: the rocket, the earth, the moon, the sun and other mysterious and magical cosmic bodies.

Drawing “Rocket in the starry sky”

Drawing “Space” with crayons and paint
I like the idea of crafts from a box (Alina)
Greetings to all readers and guests of the blog. Today I again invite you to turn on your creative abilities and do some handicrafts. After all, a very interesting and exciting holiday is coming up - Cosmonautics Day. This means that children's institutions are already preparing in full for this event.
And of course they give tasks for joint creativity, as they organize annual competitions for space theme. Therefore, I have prepared a special issue for you!! We will make neither flowers nor anything with you, but rockets, planets, flying saucers and much more.
I’ll immediately make a reservation that I take all the ideas for my work from the open access of the Internet. But I select from them the most creative, cool and accessible in terms of material, as well as for different ages. So read to the end, it will be interesting!!
Of course, at all times, an application is always considered to be in demand, and it can be made not only from paper and cardboard, but also from fabric, cereals.

It would be cool to do some modeling and make three-dimensional planets like this. Moreover, to create them, you can use balls of different diameters and from different materials, and then just paint them. Or mold it from plasticine or salt dough.

Volumetric postcards made of paper, corrugation or fabric also look cool.

You can make such a symbolic picture. Take a black background, glue a blue ball and decorate the rest of the elements with rhinestones.

Here is another great option made from salt dough. It looks very beautiful and bright.

But look what you can make from felt. And we do without sewing!!

How do you like these funny space freaks, which are put in a regular box, sealed with a blue background and decorated with stars?

A cool option made from various available materials.

Paper voluminous postcard in the style of a baby book.

How do you like this flying saucer made of disk and beads?! Looks very impressive, doesn't it??

Everything here is molded from plasticine, by the way, you can do it as a team work.

You can, in principle, not bother, and take and draw, and then put it in a frame and you're done !!

And if, on the contrary, you want to surprise everyone, and there is time left, then make pasta souvenirs. We looked at this technique when we did it.


As you can see, there is always a choice, the main thing is not to be lazy!!
And now I want to invite you to make a very simple flying saucer. We will make it from ordinary paper plates, if there are none, you can use plastic or cardboard.

You will need: two paper plates, pencils, markers, paints, glue, brush.
Work process:
1. Take plates and paint them any color. You can immediately take colored plates.

2. After the paint has dried, draw patterns on them with a pencil.

3. Color them with a marker or paints.

4. Then glue them together. Complete the composition with an alien made of plasticine.
You see how easy and fast everything is, and the main thing is that kids can do this kind of work.
And I also picked up a couple of options from the most favorite materials for creativity (paper and cardboard). Look, choose and show your children, let them make them.
A simple astronaut made from cones!

This work can be done not only from cardboard, but also from felt. And I really like the idea with photographs.

Naturally, do not forget about the application, prepare templates, cut and glue.

You can also use the origami technique.

Here the option is more complicated, since it requires small work and knowledge in the quilling technique.

And now we’ll sew a green alien. Many people will definitely like this craft.

You will need: green, blue and black felt, green, black and white sewing threads, gold beads No. 10, foam rubber or cotton wool, sewing needle, marker, glue.
Work process:
1. Prepare the templates first and then transfer them onto the fabric.

2. Then following step by step instructions Sew the weirdo below.

Let's see what else you can create from this wonderful material called felt:
The easiest thing to do is to cut out the silhouettes, then glue them onto the background.


For older children, and for those who sew well, of course, voluminous crafts will be advantageous:


The last work, of course, will require the help of adults.
Now let's see what we can offer older guys. You can choose the options that we discussed above, or you can think about it and choose from the following.
The image of space is always relevant. Take an empty box, make a background of paints, glue paper stars. Blind the planets and hang them on strings.

Excellent teamwork. Make origami rockets and glue them on.

Cool version of salt dough!!

And look at the cool use of egg molds!!

What do you think of the idea of using a light bulb?!

Well, everything is simple here, schoolchildren can easily cope with such a postcard.

Using a plastic bottle and plasticine.

Here is a whole cosmic composition, a great idea for creativity.

And here are the plasticine masterpieces:


Cool and original products for April 12 can be made from ordinary plastic bottles, just look at these souvenirs:


Alternatively, you can use not the whole bottle, but only the neck, and add a Kinder Surprise egg.

And I suggest you watch a video story from which you will learn how to easily and beautifully make a space satellite.
A popular craft for this holiday is a rocket. Well, let's see how we can make it too. Found it good instructions on the website Maam.ru. I thought this option was cool, since everything is made from simple materials and anyone can do it.

You will need: toilet roll, colored cardboard or paper, scissors, glue, pencil.

Work process:
1. Cut out a large circle from thick paper or cardboard. Cut out a small triangle from it.

2. Roll into a cone and glue with glue. Then make small cuts around the entire circumference.

3. Glue onto the sleeve.

4. Cut out small circles and glue them too, imitating a porthole.

5. Make cuts on both sides of the sleeve.


7. Insert this strip into the prepared slots. The rocket is ready to fly!!

This is how easy and quick a souvenir is to make. Did you like it?!!
Children's favorite materials for creativity have always been and remain plasticine, modeling clay or salt dough. After all, there is a great flight of imagination here and you can create whatever you want!!


I found another cool video, and it’s hosted by a child. So be sure to show it to your kids and let them make a cool craft for Cosmonautics Day themselves.
And a few more pictures for your creativity:


And in conclusion, I offer different templates for any type of crafts, and for applique, for postcards, for sewing and drawing, or plasticine creativity.
I won’t describe it, since everything is obvious. Your task is to save and print.


Our exciting adventure with you has come to an end. space trip!! Make your choice, participate in competitions and win, and just create for your own pleasure!!
Lorena Kormiteleva
Manufacture we will do crafts in technology« Paper tunnel» .
This is the beauty we will make for you.
Let's get creative!
For work we need:

1. Scissors
2. Cardboard 5 sheets (black color)
2 accordion sheets
3 sheets for background
3. Printed blanks of planets and space background

4. PVA glue
5. A box of chocolates served as a frame for me (you can make from paper)
6. Ruler, pencil
7. Paints (gouache)
Our tunnel consists of 3 elements. We cut out circles in sheets of cardboard, clearly in the middle. We decorate with paints using the spray method.

Now we need to make the side parts of our tunnel.
We measure the height and width of the box.
Then we make two accordions that match the height of your product. Harmonic divided by 1.5 cm.

Glue the folds.

Glue the background into the box. We insert accordions and glue them.

View from above.


Close-up.

Since my box is white, I covered it with black paper.
Paper tunnel"Space" ready!
Publications on the topic:
Good afternoon, dear colleagues! I bring to your attention a craft on the theme of fire safety, made using the “Paper Tunnel” technique.
Take a medium-sized hoop and wrap it with insulating tape. Cover it with fabric of the appropriate color. Make balls out of paper.
The “Cosmos” laptop book is intended for teachers to work with children aged 5-6 years in a group. I made it from an ordinary cardboard box and covered it with self-adhesive.
To make a model, you need the following materials: - Watercolor sheet (A3 format) - 1 pc. ; -watercolor paints (colors: gray, white, black); -simple.
1. For work we will need: - colored paper- black cardboard - glue - scissors - pencil 2. Cut out a rocket stencil from cardboard.
The holiday of Cosmonautics Day is approaching. This year we celebrate the 55th anniversary of Yu. A. Gagarin's first space flight. Due.
On April 2, our entire country celebrates Cosmonautics Day. In 1961, it was on this day that our planet was shocked by unexpected news: “Man.
An important attribute of any event dedicated to Cosmonautics Day is various crafts on the theme “Space”. These can be either stars and planets cut out of paper, or more complex man-made products: rockets and flying saucers.
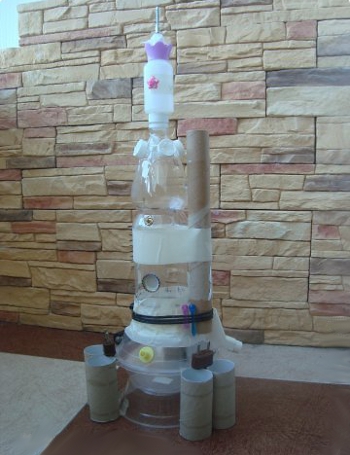
This easy-to-make craft can soar up like a real space rocket! The model can be made for Cosmonautics Day and with its help explain to children the operation of some laws of aerodynamics.
We need:

Since the main purpose of a rocket made from a plastic bottle is to launch it into a spectacular flight, at the end of which it, alas, will fall apart, it is not necessary to tinker with the model for hours, designing every detail. It is enough to make 4 parts from cardboard - a cone-shaped “roof” and 3 blades and tape them tightly to the bottle with tape.
Insert the pump needle into the bottle cap. Make sure that the hole matches the diameter of the needle, otherwise water will leak out. Alternatively, water can be poured immediately before launching the rocket. Now it's time to put the pump into action! You can see what a rocket flight from a plastic bottle looks like in video 1. From parts of a collapsed craft, you can assemble a new one and launch it dozens of times a day!
Believe it or not, you can even make a themed mini-masterpiece for Cosmonautics Day from a roll of used toilet paper or paper towel. In addition to it, we will need:
If you were wondering why you need a beer glass for paper crafts, the answer is simple. According to the diameter of its neck, we cut out a round blank for the head compartment of our rocket from colored paper. We turn the glass over, place it on a sheet, trace it in a circle, and cut it out. In the resulting workpiece you need to make a cut along the radius.

We cut out a fragment from colored paper, which, when rolled into a tube, should be approximately 1/4 wider than the diameter of the sleeve and several cm longer than it. We wrap it around the sleeve and carefully glue it. We pay special attention to the design of the edges.

We bend the edges of one of the sides (the one to which the head compartment will be attached) as shown in the figure.


Now we need to make a cone from our blank. Fold the paper as shown in fig. 5. and glue it well. With an awl, punch a hole in the top of the cone and thread a double-folded string through it (you will need it to hang the rocket). Tie the ends of the string and pull them inside the cone to make a loop.


Cut the tape or corrugated paper on the strips and glue them inside the paper tube from the bottom. Our space rocket has gained fluttering flames from the tail section!


Apply glue to the top of the tube and attach the rocket head compartment blank. When the glue is completely dry, the craft can be hung by a string.

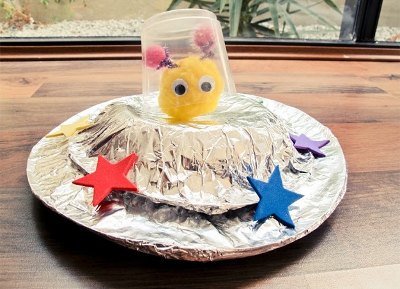
Simple decor for a room or school office for Cosmonautics Day can be done in a hurry. The basis of the craft is ordinary paper picnic plates (plastic ones will not work, as they are not very convenient to paint).
Necessary materials:

One UFO consists of 2 halves-plates. We paint the bottom of two plates in the same style. We cut the reflective tape into narrow strips 10-15 cm long. We coat the rim of one of the plates with glue and glue the strips of tape, keeping equal intervals. While the glue is not dry, cover this half with a second plate to make a “sandwich”.
Summary: Cosmonautics Day. DIY crafts for Cosmonautics Day. Children's crafts on the theme of space
In recent years, many schools and kindergartens have begun to organize exhibitions of children's crafts on the theme of space on the eve of Cosmonautics Day. In this article we will tell you about what interesting crafts you can do with your children for this holiday. The most popular material used for crafts for Cosmonautics Day is the so-called. waste material: plastic bottles, cardboard boxes, cardboard toilet paper rolls, parts from broken toys, etc. When making crafts, it’s also good to have a glue gun on hand.
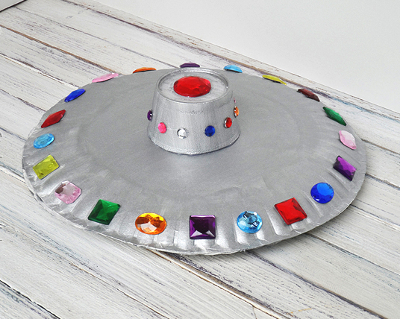
It's very easy to make a flying saucer from plastic or paper disposable plates. For this Cosmonautics Day craft, select plates of different diameters and depths.
The finished flying saucer can be wrapped in foil
or paint it with silver spray paint. Don't forget to make signal lights for the flying saucer, for example, from buttons or rhinestones.
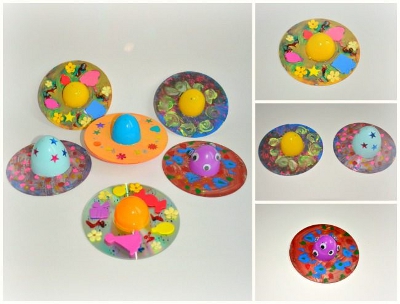
You can also make a flying saucer from an unnecessary CD and half a Kinder egg.
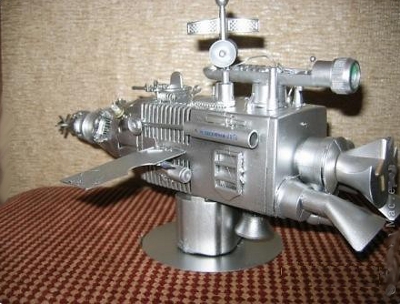
In this section we will tell you about one in an interesting way make crafts with your own hands for Cosmonautics Day. A beautiful starship or space station can be made from waste material that you can easily find at home. Using a glue gun or double-sided tape, fasten all the parts of the craft together. Finally, paint your Cosmonautics Day craft with silver spray paint. Additional details can be painted with acrylic paints.
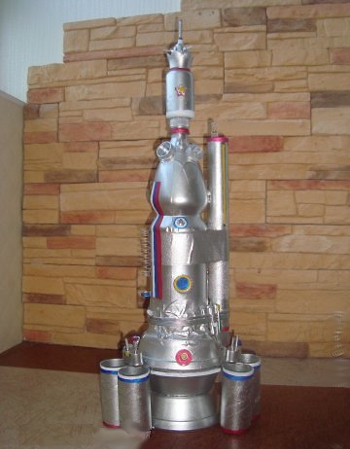
Here is another example of a similar craft for Cosmonautics Day. The body of the space station is made from an old aquarium filter, a wheel from a typewriter, a plastic bottle, remnants of pens and all sorts of broken toys, the wings are a cut floppy disk. Everything is covered with spray paint. Link .
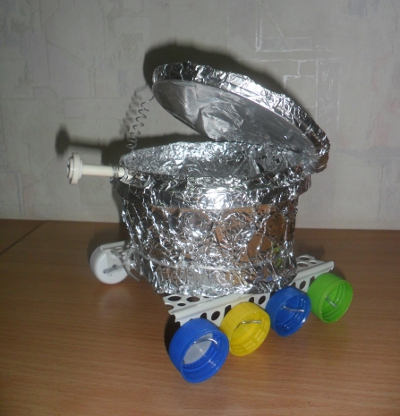
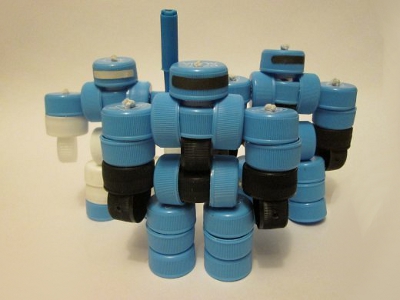
If your space-themed craft made from scrap material doesn't have many small parts, you can simply wrap it in foil at the end. Look at this lunar rover made from a plastic jar and bottle caps.
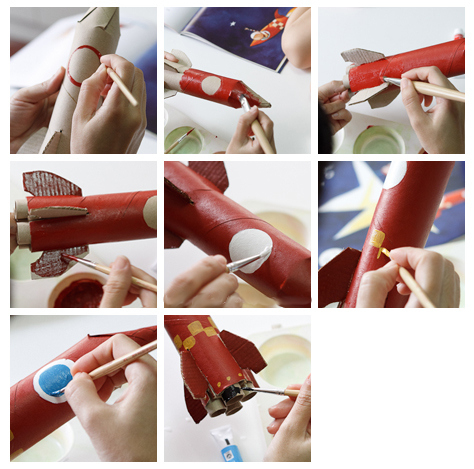
The easiest way to make a rocket for Cosmonautics Day is from a cardboard roll. In the photos below you will find detailed master class on how to make this space craft with your own hands.

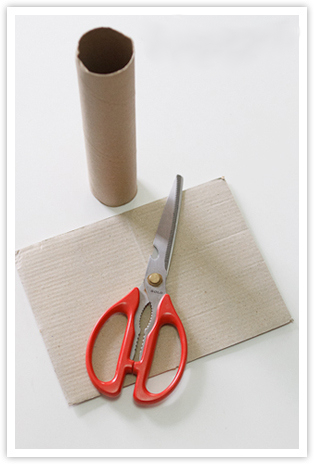
Make cuts on one side of the roll. Twist the strips into a cone and glue them together.

Use an extra piece of cardboard to make a rocket stand and engines.

Paint the rocket with paint. The space craft is ready!
Robot made of corrugated cardboard. Link
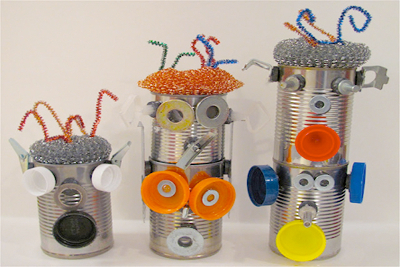
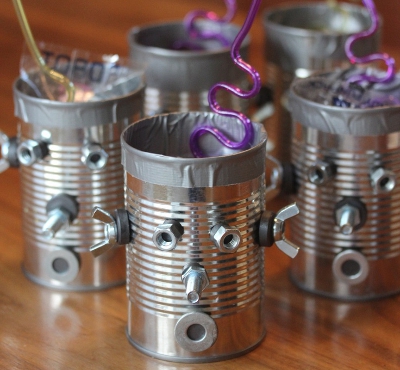
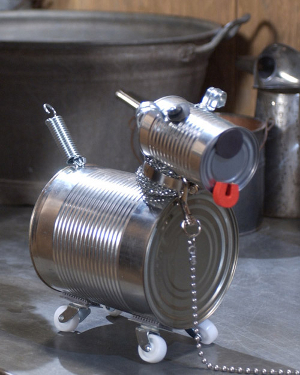
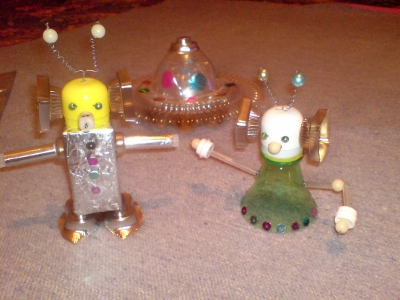
Robots made from cans
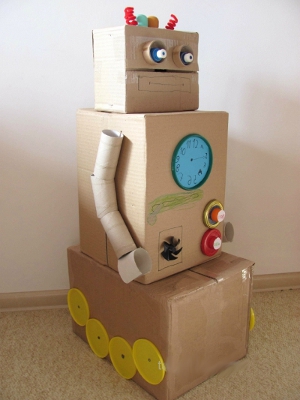
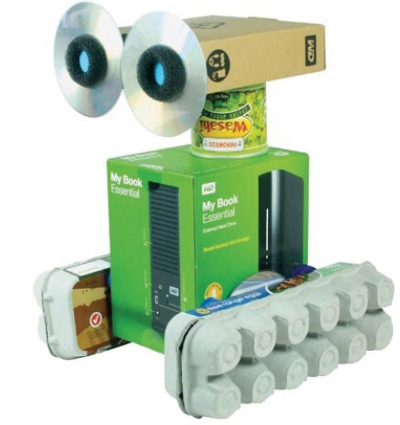
Robots made from cardboard boxes
You can make a humanoid from newspapers and napkins, wrapping them on the outside with foil.

You can make an alien out of plasticine

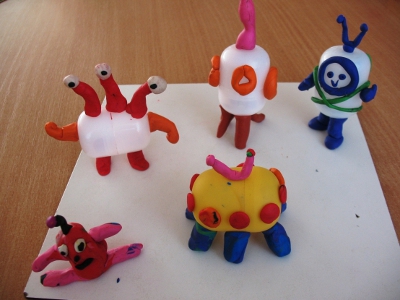
or made from waste material.
A simple craft for children for Cosmonautics Day is a paper applique.
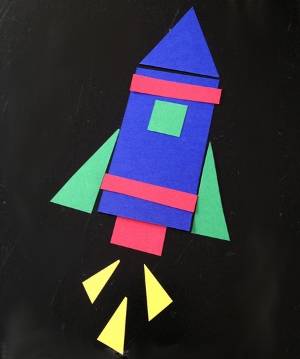
Geometric rocket applique
Paper rocket using origami technique


